Debugging Ansible collections in Pycharm

In my day job at Red Hat I work on the os-migrate project which allows users to migrate their workloads from one Openstack deployment to another.

The project uses ansible to achieve this.

My colleague has a nice write up on os-migrate @ https://www.jistr.com/blog/2021-07-12-introduction-to-os-migrate/ and you can see the official docs @ https://os-migrate.github.io/os-migrate/.

I am working on a new feature and I need to be able to debug my code changes in a nice debugger where I can step through and inspect code.

With ansible collections this isn’t as easy as regular python script or web projects as the ansible playbooks are by default run from the `~/.ansible` directory after installation using ansible-galaxy.

I use Pycharm primarily and with the help of Deepak Kothandan’s excellent Debugging Custom Ansible Modules with PyCharm post I have found a very neat way to debug the os-migrate ansible collection using the Python Debug Server built in to Pycharm and a local python virtual environment.

These are the steps I followed:

pip install pydevd-pycharm~=212.5284.44 # this will differ for your installed Pycharm version
  • Create a “Python Debug Server” Run/Debug configuration to start the debug server
a Run/Debug configuration to start the debug server
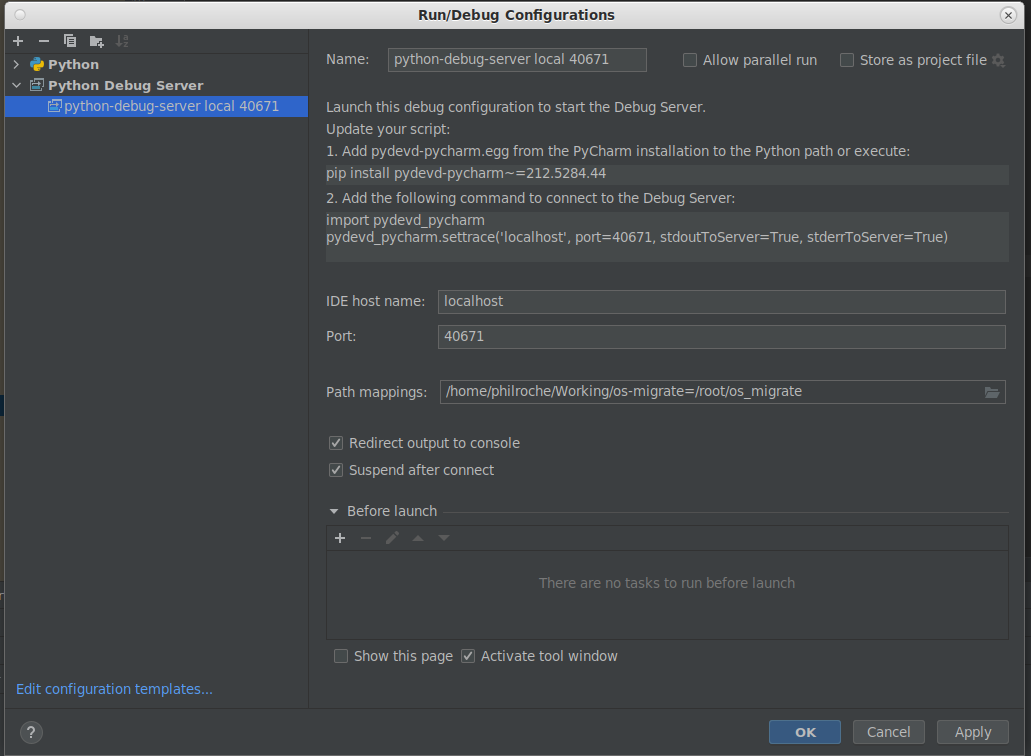
  • Start the Debug server
  • Add settrace code to the code you wish to debug
import pydevd_pycharm
pydevd_pycharm.settrace('localhost', port=40671, stdoutToServer=True, stderrToServer=True) # The port number here might differ depending on your debug configuration above
  • Build and install your ansible collection so your up to date code is used
    For os-migrate I can use our Makefile to do this
make reinstall
  • Run the code you wish to test either manually or using a different Run/Debug configuration in Pycharm. In the snippet below I am running the export networks playbook using my custom auth creds.
export OSM_DIR=/home/philroche/.ansible/collections/ansible_collections/os_migrate/os_migrate
export CUSTOM_VARIABLES="/home/philroche/Working/os-migrate/local/proche-variables.yaml"
export CUSTOM_VARIABLES_OVERRIDE="/home/philroche/Working/os-migrate/local/proche-variables-local.yaml"
export OSM_CMD="ansible-playbook -vvv -i ${OSM_DIR}/localhost_inventory.yml -e @${CUSTOM_VARIABLES} -e @${CUSTOM_VARIABLES_OVERRIDE}"
$OSM_CMD $OSM_DIR/playbooks/export_networks.yml
  • When the settrace code is reached then a debug session is started in Pycharm allowing you to step through and into your code in the Pycharm debugger interface.
Step through and into your code in the Pycharm debugger interface

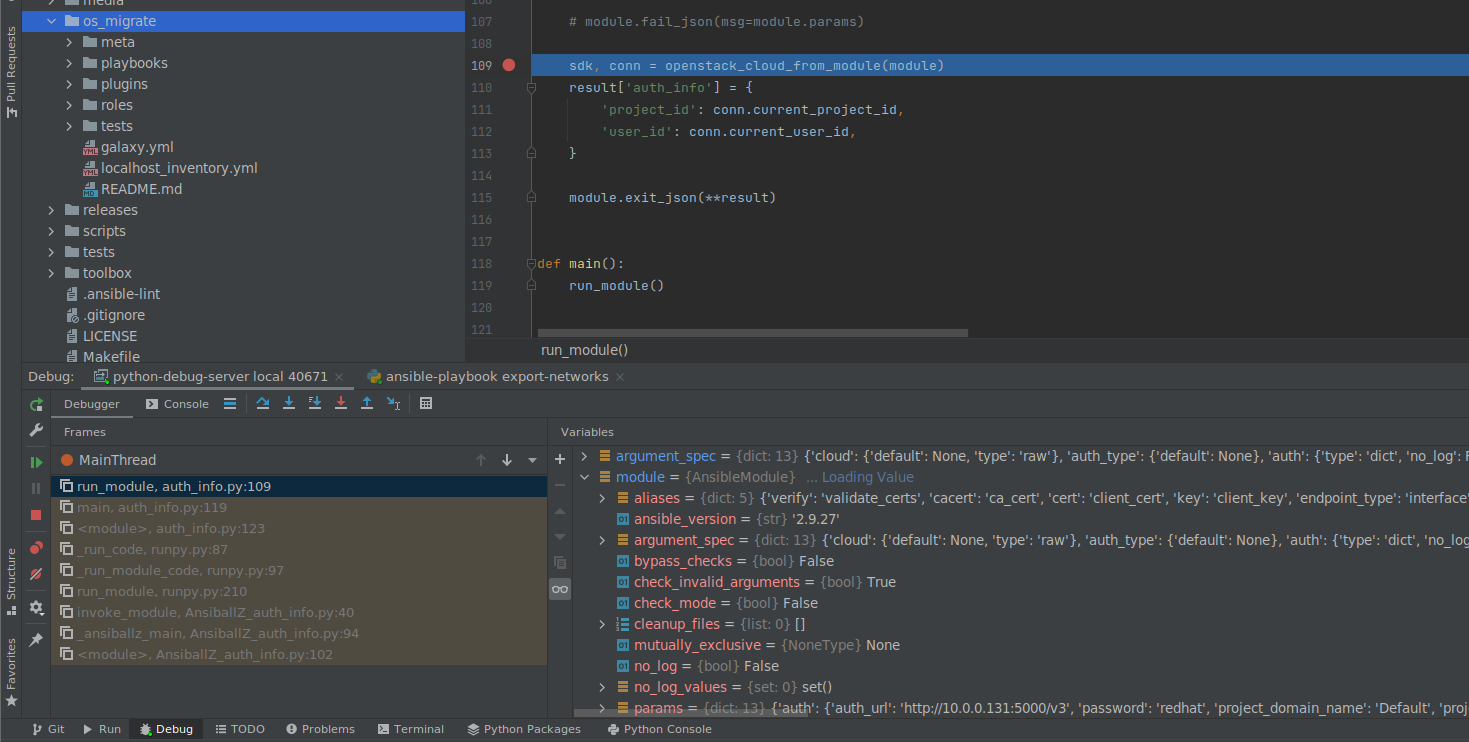
I have found this very helpful in being able to quickly iterate on changes to code in an ansible collection instead of having to wait for each `ansible-playbook` run to complete.

Package changes between two Ubuntu images

I work on the Canonical Public Cloud team and we publish all of the Ubuntu server images used in the cloud.

We often get asked what the differences are between two released images. For example what is the difference between the Ubuntu 20.04 LTS image kvm optimised image from 20200921 and the Ubuntu 20.04 LTS image kvm optimised image from 20201014, specifically what packages changed and what was included in those changes?

For each of our download images published to http://cloud-images.ubuntu.com/ we publish a package version manifest which lists all the packages installed and the versions installed at that time. It also lists any installed snaps the the revision of that snap currently installed. This is very useful for checking to see if an image you are about to use has the expected package version for your requirements or has the expected package version that addresses a vulnerability.

Example snippet from a package version manifest:

<snip>
python3-apport	2.20.11-0ubuntu27.9
python3-distutils	3.8.5-1~20.04.1
</snip>

This manifest is also useful to determine the differences between two images. You can do a simple diff of the manifests which will show you the version changes but you can also, with the help of a new ubuntu-cloud-image-changelog command line utility I have published to the Snap store, determine what changed in those packages.

ubuntu-cloud-image-changelog available from the snap store

I’ll work through an example of how to use this tool now:

Using the the Ubuntu 20.04 LTS image kvm optimised image from 20200921 manifest and the Ubuntu 20.04 LTS image kvm optimised image from 20201014 manifest we can find the package version diff.

$ diff 20200921.1-ubuntu-20.04-server-cloudimg-amd64-disk-kvm.manifest 20201014-ubuntu-20.04-server-cloudimg-amd64-disk-kvm.manifest
<snip>
426c426
< python3-apport	2.20.11-0ubuntu27.8
---
> python3-apport	2.20.11-0ubuntu27.9
446c446
< python3-distutils	3.8.2-1ubuntu1
---
> python3-distutils	3.8.5-1~20.04.1
</snip>

This snippet above is a subset of the packages that changed but you can easily see the version changes. Full diff available @ https://pastebin.ubuntu.com/p/mzVBzfC5tw/ .

To see the actual changelog for those package version changes…

$ #install ubuntu-cloud-image-changelog
$ sudo snap install ubuntu-cloud-image-changelog
$ ubuntu-cloud-image-changelog --from-manifest=20200921.1-ubuntu-20.04-server-cloudimg-amd64-disk-kvm.manifest --to-manifest=20201014-ubuntu-20.04-server-cloudimg-amd64-disk-kvm.manifest
<snip>
Snap packages added: []
Snap packages removed: []
Snap packages changed: ['snapd']
Deb packages added: ['linux-headers-5.4.0-1026-kvm', 'linux-image-5.4.0-1026-kvm', 'linux-kvm-headers-5.4.0-1026', 'linux-modules-5.4.0-1026-kvm', 'python3-pexpect', 'python3-ptyprocess']
Deb packages removed: ['linux-headers-5.4.0-1023-kvm', 'linux-image-5.4.0-1023-kvm', 'linux-kvm-headers-5.4.0-1023', 'linux-modules-5.4.0-1023-kvm']
Deb packages changed: ['alsa-ucm-conf', 'apport', 'bolt', 'busybox-initramfs', 'busybox-static', 'finalrd', 'gcc-10-base:amd64', 'gir1.2-packagekitglib-1.0', 'language-selector-common', 'libbrotli1:amd64', 'libc-bin', 'libc6:amd64', 'libgcc-s1:amd64', 'libpackagekit-glib2-18:amd64', 'libpython3.8:amd64', 'libpython3.8-minimal:amd64', 'libpython3.8-stdlib:amd64', 'libstdc++6:amd64', 'libuv1:amd64', 'linux-headers-kvm', 'linux-image-kvm', 'linux-kvm', 'locales', 'mdadm', 'packagekit', 'packagekit-tools', 'python3-apport', 'python3-distutils', 'python3-gdbm:amd64', 'python3-lib2to3', 'python3-problem-report', 'python3-urllib3', 'python3.8', 'python3.8-minimal', 'secureboot-db', 'shim', 'shim-signed', 'snapd', 'sosreport', 'zlib1g:amd64']

</snip>

<snip>
======================================================================
python3-apport changed from version '2.20.11-0ubuntu27.8' to version '2.20.11-0ubuntu27.9'

Source: apport
Version: 2.20.11-0ubuntu27.9
Distribution: focal
Urgency: medium
Maintainer: Brian Murray < - >
Timestamp: 1599065319
Date: Wed, 02 Sep 2020 09:48:39 -0700
Changes:
 apport (2.20.11-0ubuntu27.9) focal; urgency=medium
 .
   [ YC Cheng ]
   * apport/apport/hookutils.py: add acpidump using built-in
     dump_acpi_tables.py. (LP: #1888352)
   * bin/oem-getlogs: add "-E" in the usage, since we'd like to talk to
     pulseaudio session and that need environment infomation. Also remove
     acpidump since we will use the one from hook.
 .
 apport (2.20.11-0ubuntu27.8) focal; urgency=medium
 .
   [Brian Murray]
   * Fix pep8 errors regarding ambiguous variables.

======================================================================
python3-distutils changed from version '3.8.2-1ubuntu1' to version '3.8.5-1~20.04.1'

Source: python3-stdlib-extensions
Version: 3.8.5-1~20.04.1
Distribution: focal-proposed
Urgency: medium
Maintainer: Matthias Klose <->
Timestamp: 1597062287
Date: Mon, 10 Aug 2020 14:24:47 +0200
Closes: 960653
Changes:
 python3-stdlib-extensions (3.8.5-1~20.04.1) focal-proposed; urgency=medium
 .
   * SRU: LP: #1889218. Backport Python 3.8.5 to 20.04 LTS.
   * Build as well for 3.9, except on i386.
 .
 python3-stdlib-extensions (3.8.5-1) unstable; urgency=medium
 .
   * Update 3.8 extensions and modules to the 3.8.5 release.
 .
 python3-stdlib-extensions (3.8.4-1) unstable; urgency=medium
 .
   * Update 3.8 extensions and modules to the 3.8.4 release.
 .
 python3-stdlib-extensions (3.8.4~rc1-1) unstable; urgency=medium
 .
   * Update 3.8 extensions and modules to 3.8.4 release candidate 1.
 .
 python3-stdlib-extensions (3.8.3-2) unstable; urgency=medium
 .
   * Remove bytecode files for 3.7 on upgrade. Closes: #960653.
   * Bump debhelper version.
 .
 python3-stdlib-extensions (3.8.3-1) unstable; urgency=medium
 .
   * Stop building extensions for 3.7.
   * Update 3.8 extensions and modules to 3.8.3 release.

======================================================================
</snip>

Above is a snippet of the output where you can see the exact changes made between the two versions. Full changelog available @ https://pastebin.ubuntu.com/p/cJVwVqzfgh/.

I have found this very useful when tracking why a package version changes and also if a package version change includes patches addressing a specific vulnerability.

We don’t yet publish package version manifests for all of our cloud images so to help in generating manifests I published the ubuntu-package-manifest command line utility to easily generate a package version manifest for any Ubuntu or Debian based image or running instance for later use with ubuntu-cloud-image-changelog.

ubuntu-package-manifest available from the snap store
$ sudo snap install ubuntu-package-manifest
$ # This is a strict snap and requires you to connect the system-backup interface
$ # https://snapcraft.io/docs/the-system-backup-interface 
$ # to access the host system package list. This is access read-only.
$ snap connect ubuntu-package-manifest:system-data
$ sudo ubuntu-package-manifest

You can even use this on a running desktop install to track package version changes.

ps. We’re hiring in the Americas and in EMEA šŸ™‚

Using Snaps to package old software

On Ubuntu Linux snaps are app packages for desktop, cloud and IoT that are easy to install, secure, crossā€platform and dependencyā€free and their main selling point is security and confinement.

Traditionally packaging for Ubuntu is via .deb packages but much as I try, I never find it straight forward to create or maintain deb packages and I find creating snap packages much easier.

One use case of snaps which doesn’t get talked about much is using snaps to bring no longer supported software back to life. For example, in Ubuntu 20.10 (Groovy Gorilla) which is soon to be released there is no longer support for python2 by default and many other packages have been deprecated too in favour of newer and better replacements. This does mean though that packages which depended on these deprecated packages are not installable and will not run. Snaps can fix this.

Snaps have the concept of Base snaps where is snap can specify a runtime which is based on a previous release of Ubuntu.

  • core20 base is based on Ubuntu 20.04
  • core18 base is based on Ubuntu 18.04
  • core base is based on Ubuntu 16.04

As such you can create snap packages of any software that is installable on any of these previous Ubuntu releases and run that snap on newer releases of Ubuntu.

My workflow relies on many applications, most of which are still installable on Ubuntu 20.10 but I have found three that are not.

To unblock my workflow I created snaps of these @ https://github.com/philroche/bzr-explorer-snap, https://github.com/philroche/syncthing-gtk-snap and https://github.com/philroche/kitematic-snap which are all snaps using the core18 and core20 base snaps.

Note that these snaps are classic snaps and are not confined as is recommended for most snaps but it does unblock my workflow and is a neat use of snap packaging.

If you need help packaging a deprecated deb package as a snap please reach out.

Bazaar Explorer as a snap
Syncthing-gtk as a snap
kitematic as a snap
kitematic as a snap

Migrating away from WordPress… but not really

For as long as I can remember I have hosted this blog on Dreamhost using WordPress. Last year I migrated to their Dreampress service but for the tiny amounts of traffic it wasn’t worth it. Well that and the non stop emails about my wordpress install being vulnerable.

The cost and the hassle are what prompted my move away from this set up. I wanted to start serving aĀ  static blog using something like Hugo, Jekyll, Nikola or PelicanĀ but that meantĀ  importing all my wordpress posts and which I didn’t fancy doing so I settled on using a local install of WordPress (on my Freenas server) and the excellent Simply Static plugin to generate a static site from a WordPress install.

The install of WordPress is only accessible on my network so no more vulerability issues. I get all the benefits of WordPress like Social links and Analytics plugins with the added bonus of a blazing fast static site.

So far I have been very happy with the set up. If you notice any issues pelase let me know @philroche.

Ubuntu cloud images and how to find the most recent cloud image – part 2/3

TLDR;

sudo snap install image-status

This will install a snap of the very useful `image-status` utility.

image-status cloud-release bionic

This will show you the serial for the most recent Ubuntu 18.04 Bionic cloud image in QCOW format.

image-status ec2-release bionic

This will show you the AWS EC2 AMIs for the most recent Ubuntu 18.04 Bionic AWS EC2 cloud images.


Part two of a three part series.

Following on from part 1 where I detailed simplestreams and sstream-query I present to you the `image-status` utility which is a very neat and useful wrapper around sstream-query.

image-status is hosted on github as part of Scott Moser‘s talk-simplestreams repo.

I recently submitted a pull request which added the ability to package image-status as a snap. This was merged and you can now install image-status on any linux distribution supporting snaps using the following command.

sudo snap install image-status

Once installed you can start querying the simplestreams feeds for details on the most recent Ubuntu cloud images.

Usage:

image-status --help # to see all available options

image-status cloud-release bionic # to see most recent Ubuntu Bionic release images onĀ http://cloud-images.ubuntu.com/
image-status cloud-daily bionic # to see most recent Ubuntu Bionic daily images onĀ http://cloud-images.ubuntu.com/

image-status gce-release bionic # to see most recent Ubuntu Bionic release images on GCE
image-status gce-dailybionic # to see most recent UbuntuBionic daily images on GCE

image-status ec2-release bionic # to see most recent Ubuntu Bionic release AMIs on EC2
image-status ec2-daily bionic # to see most recent UbuntuBionic daily AMIs on EC2

image-status azure-release bionic # to see most recent Ubuntu Bionic release images on Azure
image-status azure-daily bionic # to see most recent UbuntuBionic daily images on Azure

image-status maas-release bionic # to see most recent Ubuntu Bionic release images for maas V2
image-status maas-daily bionic # to see most recent UbuntuBionic daily images for maas V2

image-status maas3-release bionic # to see most recent Ubuntu Bionic release images for maas V3
image-status maas3-daily bionic # to see most recent Ubuntu Bionic daily images for maas V3

I find this very useful when trying to quickly see what is the most recent Ubuntu release on any particular public cloud. eg:

image-status ec2-release bionic | grep eu-west-1 | grep hvm | grep ssd | awk '{split($0,a," "); print a[6]}'

This will return the ID for the most recent HVM EBS Ubuntu 18.04 (Bionic) in the eu-west-1 AWS EC2 region. This can be achieved using sstream-query too but I find filtering using grep to be easier to understand and iterate with.

I hope the above is helpful with your automation.

Google Photos Programming ā€œAPIā€ Hack

When investigating using theĀ python api for Google PhotosĀ it soon became apparent that it was no longer possible to add existing photos to an existing album.

The video shows how I managed to do this by recording http requests in Google Chrome and exporting to Curl Command.

You will have to export the request every time your logged in session expires but for my usecase this is not a problem.

I hope this helps someone.

Ubuntu cloud images and how to find the most recent cloud image – part 1/3

TLDR;

sstream-query --json --max=1 --keyring=/usr/share/keyrings/ubuntu-cloudimage-keyring.gpg http://cloud-images.ubuntu.com/releases/streams/v1/com.ubuntu.cloud:released:download.sjson arch=amd64 release_codename='Xenial Xerus' ftype='disk1.img' | jq -r '.[].item_url'

This will show you the URL for the most recent Ubuntu 16.04 Xenial cloud image in QCOW format.


Part one of a three part series.

There are a few ways to find the most recent Ubuntu cloud image an the simplest method is to view the release pageĀ which lists the most recent release.

Another method is to use the cloud image simple streams data which we also update every time we (I work on the Certified Public Cloud team @ Canonical) publish an image.

We publish simple streams data for major public clouds too but this post deals with the base Ubuntu cloud image. I will follow up this post with details on how to use the cloud specific streams data.

Simple streams

Simple streams is a structured format describing the Ubuntu cloud image releases.

You can parse the Ubuntu’s release cloud image stream jsonĀ yourself or you can use a combination of sstream-query and jq (install packages “ubuntu-cloudimage-keyring“, “simplestreams” and “jq“) to get all or specific data about the most recent release.

Query all data from most recent release

sstream-query --json --max=1 --keyring=/usr/share/keyrings/ubuntu-cloudimage-keyring.gpg http://cloud-images.ubuntu.com/releases/ arch=amd64 release='xenial' ftype='disk1.img'

This will return all data on the release including date released and also the checksums of the file.

[
 {
 "aliases": "16.04,default,lts,x,xenial",
 "arch": "amd64",
 "content_id": "com.ubuntu.cloud:released:download",
 "datatype": "image-downloads",
 "format": "products:1.0",
 "ftype": "disk1.img",
 "item_name": "disk1.img",
 "item_url": "http://cloud-images.ubuntu.com/releases/server/releases/xenial/release-20180126/ubuntu-16.04-server-cloudimg-amd64-disk1.img",
 "label": "release",
 "license": "http://www.canonical.com/intellectual-property-policy",
 "md5": "9cb8ed487ad8fbc8b7d082968915c4fd",
 "os": "ubuntu",
 "path": "server/releases/xenial/release-20180126/ubuntu-16.04-server-cloudimg-amd64-disk1.img",
 "product_name": "com.ubuntu.cloud:server:16.04:amd64",
 "pubname": "ubuntu-xenial-16.04-amd64-server-20180126",
 "release": "xenial",
 "release_codename": "Xenial Xerus",
 "release_title": "16.04 LTS",
 "sha256": "da7a59cbaf43eaaa83ded0b0588bdcee4e722d9355bd6b9bfddd01b2e7e372e2",
 "size": "289603584",
 "support_eol": "2021-04-21",
 "supported": "True",
 "updated": "Wed, 07 Feb 2018 03:58:59 +0000",
 "version": "16.04",
 "version_name": "20180126"
 }
 ]

Query only the url to the most recent release

sstream-query --json --max=1 --keyring=/usr/share/keyrings/ubuntu-cloudimage-keyring.gpg http://cloud-images.ubuntu.com/releases/streams/v1/com.ubuntu.cloud:released:download.sjson arch=amd64 release_codename='Xenial Xerus' ftype='disk1.img' | jq -r '.[].item_url'

This will show you the URL for the most recent Ubuntu 16.04 Xenial cloud image in QCOW format.

"http://cloud-images.ubuntu.com/releases/server/releases/xenial/release-20180126/ubuntu-16.04-server-cloudimg-amd64-disk1.img"

Query only the serial of the most recent release

sstream-query --json --max=1 --keyring=/usr/share/keyrings/ubuntu-cloudimage-keyring.gpg http://cloud-images.ubuntu.com/releases/ arch=amd64 release_codename='Xenial Xerus' ftype='disk1.img' | jq ".[].version_name"

This will show you the serial of the most recent Ubuntu 16.04 Xenial cloud image.

"20180126"

The above streams are signed using keys in the ubuntu-cloudimage-keyring keyring but you can replace the –keyring option with –no-verify to bypass any signing checks. Another way to bypass the checks is to to use the unsigned streams.

It is also worth noting that OpenStack can be configured to use streams too.

I hope the above is helpful with your automation.

Xerox DocuMate 3220 scanner on Ubuntu

TLDR; This blog post is confirming that the Xerox DocuMate 3220 does work on Ubuntu and shows how to add permissions for non root users to use it.

——————————————-

I was using my wife’s old printer/scanner all in one for scanning documents and it worked well but it was a pain to scan multiple documents so I decided to get a business scanner with auto feed and duplex scanning.

I went for the Xerox DocuMate 3220 as it stated it was SANE compatible so would work on Linux.

DM3220_img1.jpg

With an RRP of ~ā‚¬310 I managed to get a refurbished model for ā‚¬98 delivered from ebay but sadly I didn’t do enough research as the scanner is not SANE supported.

In my research in trying to add the scanner to the xerox_mfp SANE backend config (which didn’t work) I discovered that VueScan was available for Linux and it’s supported scanners did list some of the Xerox DocuMate series. I had used VueScan on my old MacBook Pro and was very happy with so I gave it a shot. Note that VueScan is not Open Source and not free but it is excellent software and well worth the ā‚¬25 purchase price.

Lo and behold it found the scanner and it supported all of the scanner’s features.

  • Flatbed scanning
  • Auto feed
  • Duplex auto feed

However VueScan would only detect the scanner when run as root due to libusb permissions.

To add permissions for non root users to use the scanner I made the following changes. This guide should also be helpful when changing permissions for any USB device. The following changes were made on an Ubuntu 17.10 machine.

# Add myself to the scanner group. You can do this through the “Users and Groups” GUI too.

philroche@bomek:$ sudo usermod -a -G scanner philroche

# Find the scanner vendor id and product id

Running dmesg we can see the scanner listed with idVendor=04a7 and idProduct=04bf

philroche@bomek$ dmesg
usb 1-2.4.3: new high-speed USB device number 26 using xhci_hcd
usb 1-2.4.3: New USB device found, idVendor=04a7, idProduct=04bf
usb 1-2.4.3: New USB device strings: Mfr=1, Product=2, SerialNumber=3
usb 1-2.4.3: Product: DM3220
usb 1-2.4.3: Manufacturer: Xerox
usb 1-2.4.3: SerialNumber: 3ASDHC0333

Note: The device number will most likley be different on your system.

Running lsusb we can see that the scanner is also listed as “Visioneer”

philroche@bomek:$ lsusb
Bus 001 Device 026: ID 04a7:04bf Visioneer

Note: As with the the device number, the Bus used is likley to be different on your system.

We can see above that the device is on bus 001 as device 026. Using this info we can get full udev (Dynamic device management) info.

philroche@bomek:$ udevadm info -a -p $(udevadm info -q path -n /dev/bus/usb/001/026)
looking at device '/devices/pci0000:00/0000:00:14.0/usb1/1-2/1-2.4/1-2.4.3':
 KERNEL=="1-2.4.3"
 SUBSYSTEM=="usb"
 DRIVER=="usb"
 ATTR{authorized}=="1"
 ATTR{avoid_reset_quirk}=="0"
 ATTR{bConfigurationValue}=="1"
 ATTR{bDeviceClass}=="00"
 ATTR{bDeviceProtocol}=="00"
 ATTR{bDeviceSubClass}=="00"
 ATTR{bMaxPacketSize0}=="64"
 ATTR{bMaxPower}=="0mA"
 ATTR{bNumConfigurations}=="1"
 ATTR{bNumInterfaces}==" 1"
 ATTR{bcdDevice}=="0001"
 ATTR{bmAttributes}=="c0"
 ATTR{busnum}=="1"
 ATTR{configuration}==""
 ATTR{devnum}=="26"
 ATTR{devpath}=="2.4.3"
 ATTR{idProduct}=="04bf"
 ATTR{idVendor}=="04a7"
 ATTR{ltm_capable}=="no"
 ATTR{manufacturer}=="Xerox"
 ATTR{maxchild}=="0"
 ATTR{product}=="DM3220"
 ATTR{quirks}=="0x0"
 ATTR{removable}=="unknown"
 ATTR{serial}=="3ASDHC0333"
 ATTR{speed}=="480"
 ATTR{urbnum}=="1251"
 ATTR{version}==" 2.00"

This is the info we need to create our udev rule

# Add Udev rules allowing non root users access to the scanner

Create a new udev rule

philroche@bomek:$ sudo nano /etc/udev/rules.d/71-xeroxdocument3220.rules

Paste the following text to that new file

SUBSYSTEM=="usb", ATTR{manufacturer}=="Xerox", ATTR{product}=="DM3220", ATTR{idVendor}=="04a7", ATTR{idProduct}=="04bf", MODE="0666", GROUP="scanner"

This adds a rule to allow any user in the “scanner” group (which we added ourselves to earlier) permission to use the usb device with vendor 04a7 and product 04bf.

Note you will have to log out and log in for any group changes to take effect or run su - $USER

# Reload the udev rules

philroche@bomek:$ sudo udevadm control --reload-rules

# Test these new udev rules

philroche@bomek:$ udevadm test $(udevadm info -q path -n /dev/bus/usb/001/026)

You shouldn’t see any permissions related errors.

Now when you run VueScan as a non-root user you should see no permissions errors.

# Start VueScan

philroche@bomek:$ ./vuescan

Selection_238.png

Creating a VPN server on AWS using PiVPN

One of the streaming services I use called NowTVĀ recently launched an Irish service alongside their UK service which I was using. The Irish service costs _double_Ā Ā the cost in UK. They have also begun geoblocking all Irish users and also users of VPN Services like ExpressVPN and PrivateInternetAccess from using the UK service.

To get around this I decided to set up my own VPN server on AWS in their London datacenter to get around the geoblocking.

The easiest way I have found to set up a VPN server is to use PiVPN (http://www.pivpn.io/) which was designed for use on Raspberry Pi but can be installed on any Debian based machine.

There has been a few recent guidesĀ on how to install PiVPN but this one focusses on installing on AWS.

A prerequisite for this guide is that you have an AWS account. If this is your first time using AWS then you can avail of their free tier for the first year which means you could have the use of a reliable VPN server free for a whole year. You will also need an SSH keypair.

The steps are as follows:

  1. Start up an instance of Ubuntu ServerĀ on AWS in the London region
  2. Install PiVPN
  3. Download VPN configuration files for use locally

1. Start up an instance of Ubuntu ServerĀ on AWS in the London region

Log in to your AWS account and select the London region, also referred to as eu-west-1.

Selection_141 (copy).png

Create a new security group for use with your VPN server.

Selection_141.png

This new group sets up the firewall rules for our server and will allow only access to port 22 for SSH traffic and UDP port 1194 for all VPN traffic.

Selection_140.png

Launch a server instance

Selection_141.png

We will choose Ubuntu Server 16.04 as it is a Debian based distro so PiVPN will install.

Selection_142.png

Choose the t2.micro instance type. This is the instance type that is free tier elligible.

Selection_143.png

Leave instance details default

Selection_144.png

Leave storage as the default 8GB SSD

Selection_145.png

No need to add any tags

Selection_146.png

Choose the security group we previously created.

Selection_147.png

Review settings – nothing to change here.

Selection_148.png

Click Launch and specify either a new SSH keypair or an existing SSH key pair. I have chosen an existing pair which is called “philroche”.

Selection_149.png

Check the checkbox abount key access and click Launch Instances. Your instance will now launch.

Selection_150.png

Click View Instances and once state has changed to running note the IPv4 Public IP. You now have an instance on Ubuntu Server running on AWS in their London datacentre.

Selection_151.png

2. Install PiVPN

SSH in to your new server using the private key from the pair specified when launching the server.

ssh -i ~/.ssh/philroche ubuntu@%IPV4IPAddress%

substituting %IPV4IPAddress% for the IP address of your server

Selection_152.png

Once logged in update the packages on the server.

sudo apt-get update

Selection_154.png

Start the PiVPN installer.

curl -L https://install.pivpn.io | bash

For more detail on this, seeĀ http://www.pivpn.io/#tech

Selection_172.png

You are then guided through the process of installing all the required software and configuring the VPN server:

Selection_155.png

Selection_156.png

Selection_157.png

Selection_158.png

Choose the default ubuntu user.

Selection_159.png

Selection_160.png

We do want to enable unattended upgrades of security patches.

Selection_161.png

Choose UDP as the protocol to use.

Selection_162.png

Choose the default port 1194.

Selection_163.png

Selection_164.png

Create a 2048 bit encryption key.

Selection_165.png

Selection_166.png

Choose to use your servers public IP address.

Selection_167.png

Choose whichever DNS provider you would like to use. I chose Google.

Selection_168.png

Installation is now complete šŸ™‚

Selection_169.png

Choose to reboot the server.

Selection_170.png

Selection_171.png

Once the server has rebooted, checking the AWS dashboard for it’s status,Ā SSH back in to the server.

Now we need to configure a VPN profile that we can use to connect to the VPN server.

The easiest way to do this is to use the ā€‹ā€‹ā€‹ā€‹pivpn command line utility.

pivpn add

Selection_173.png

This will guide you through the process of creating a profile. Make sure to use a strong password and note both the profile name and the password as you will need these later.

Selection_174.png

Set up is now complete so you can logout.

Selection_175.png

3. Download VPN configuration files for use locally

The only thing left to do is to download the profile you created from the server so that you can use it locally.

scp -i ~/.ssh/philroche ubuntu@%IPV4IPAddress%:/home/ubuntu/ovpns/%PROFILENAME%.ovpn .

substituting %IPV4IPAddress% for the IP address of your server andĀ %PROFILENAME% with the name of the profile you created.

This will download the .ovpn file to your current directory.

Selection_177.png

Once downloaded you can import this to your VPN client software of choice.

I used the profile on a small Nexx WT3020 I had with OpenWRT installed. I connect this to my NowTV box so I can continue to use NowTV UK instead of the overpriced NowTV Ireland.

IMG_20170529_105928.jpg

I hope this guide was helpful.

The ultimate wifi upgrade

I have been procrastinating for a very long time about whether or not to take the plunge and upgrade my office/home wifisetup. The goal of the upgrade is to have complete high speed wifi coverage throughout my house and seamless hand over between access points.

TOUGHSwitch TSā€‘8ā€‘PRO

TOUGHSwitch TSā€‘8ā€‘PRO

Today I bit the bullet and decided to buy a fiveĀ pack of Ubiquiti UniFi AC Lite AP and oneĀ Ubiquiti TOUGHSwitch TSā€‘8ā€‘PRO. I could have gone for the Pro or HD access points but for my use case this was overkill.

All Ubiquiti products seem to be the industry GOTO product and we use them at Canonical sprints where we’ve never had a problem. I also purchased 305m spool of cat6 cable and aĀ Platinum Tools EZ-RJPRO Crimp Tool and connectors to make it easier to properly terminate the connections.

UniFi AC Lite AP

UniFi AC Lite AP

All the access points are (POE) Powered Over Ethernet so will not require power points in the ceiling.

This setup does require using Ubiquiti Unifi controller software but thankfully there is a docker image which sets this up and which I can run on my Freenas box.

All this means I should achieve my goal highspeed wifi throughout the house and seamless handover between access points. It will also hopefully mean that I no longer require anyĀ ethernet over powerline adapters.

I plan on taking a few pictures of the setup as it progresses as well as performing speed tests.. watch this space.